Whether you’re fixing a digitizing error, updating a corporate logo, or salvaging a high-quality thrift store find, knowing how to remove embroidery is a critical skill for any garment owner.
While machine embroidery is designed to be permanent, it isn’t invincible. With the right tools and a professional approach, you can take embroidery off almost any surface—from rugged Carhartt jackets to delicate polo shirts—without leaving a trace.
To remove embroidery without damaging fabric, cut the bobbin threads on the inside of the garment using a seam ripper or stitch eraser. Once the back is cut, use tweezers to pull the top threads from the front. Finish by steaming the fabric to close any remaining needle holes.
🛠️ The Professional Embroidery Removal Toolkit
To undo embroidery successfully, you cannot rely on standard household scissors. Machine stitches are locked into the fabric with high tension. To rip out embroidery stitches safely, you need precision instruments.
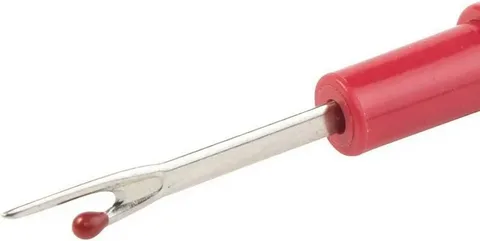
Seam Ripper: The foundational tool. Ensure it has a sharp, fine point.
Electric Stitch Eraser: Essential for large designs. It “shaves” the bobbin thread to release the top stitches instantly.
Fine-Point Tweezers: For pulling out those tiny “thread whiskers” left behind.
Magnifying Lamp: Crucial for seeing the difference between the thread and the fabric weave.
🧵 3 Expert Methods to Remove Stitches
1. The Manual Seam Ripper Method
This is the gold standard for removing an embroidered name or small logo.
The Secret: Always work from the back. Cut the white bobbin threads in small sections, then flip the garment over and pull the colored top threads out with tweezers.
2. The Electric “Stitch Eraser” Method
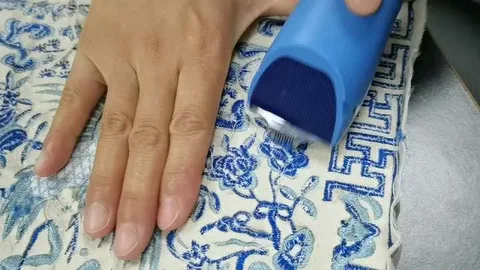
If you are wondering how to remove embroidery from a jacket or a large backpack, this is the only way to save time.
The Secret: Keep the fabric drum-tight in an embroidery hoop. Move the eraser against the grain of the stitches on the inside of the garment. It turns the bobbin thread into dust, releasing the design.
3. The Surgical Snip Method
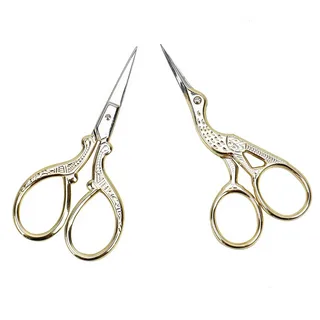
Best for unpicking embroidery on delicate items where a seam ripper might catch the fabric. Use curved embroidery scissors to snip the “bridges” between letters from the front, then pull from the back.
| Method | Best For | Speed | Risk |
|---|---|---|---|
Seam Ripper | Small Text | Slow | Low |
Stitch Eraser | Large Logos | Fast | Medium |
Scissors | Patches | Medium | Low |
👕 Fabric-Specific Guide: Where are you removing from?
How to Remove Embroidery from a Jacket (Carhartt, Denim, or Fleece)
Jackets are the most common items for logo removal. Because the fabric is heavy, it can withstand the friction of a stitch eraser.
Pro Tip: If you are removing embroidery from a waterproof jacket, remember that the needle has punctured the membrane. Use a tiny drop of seam sealer on the inside after removal to maintain water resistance.
How to Remove Embroidery from a Shirt or Polo
Knitted fabrics like piqués and jerseys are stretchy. If you pull the thread too hard, you will create a “run” in the fabric.
The Technique: Snip more frequently and pull less. This is the safest way to take embroidery off a shirt without distorting the collar or chest area.
How to Remove Embroidery from a Hat or Backpack
Hats are difficult because of their curve. You cannot easily use an electric eraser here. Stick to a sharp seam ripper and a bright light to get rid of embroidery on a hat without slicing the stiff buckram lining.
Denim & Canvas
Extremely forgiving. Holes close easily with steam and the weave recovers well after stitch removal.
Leather & Vinyl
Needle holes are permanent. Removal is not recommended unless the area will be re-covered or patched.
🔍 The Digitizer’s Perspective: Why is it so hard to remove?
As professional digitizers at EZ Stitch, we design files with “lock stitches” to ensure the logo never unravels during washing. This is why you cannot simply pull one loose thread to undo machine embroidery. You are fighting against a mechanical lock that was engineered to be permanent.
If you find that your current designs are consistently too dense or difficult to work with, it might be time to look at the hardware producing them. We’ve reviewed the industry leaders for you:
Brother SE700: The best modern hybrid machine for precision.
Brother SE400: A reliable classic for hobbyists.
Brother SE625: Incredible computerized features for high-end results.
✨ Post-Removal: How to Fix Embroidery Marks (Ghosting)
The most common fear is: Does removing embroidery damage fabric? Usually, you will see “ghosting”—tiny holes where the needle passed through.
The Spoon Trick: Place the garment on a hard, flat surface. Rub the back of a cold metal spoon over the holes in a circular motion. This “massages” the woven fibers back into their original position.
The Steam Blast: Use a steam iron to hover over the area (don’t touch the fabric yet). The moisture causes the fibers to swell, filling the needle gaps.
❓ Frequently Asked Questions
Struggling with
Stubborn Designs?
Don't ruin your garment. Let the pros digitize a perfect cover-up logo for you — fast turnaround, guaranteed quality.