Can Embroidery Be Removed?
Yes — embroidery can be removed, but it requires patience and the right tools. Removing small fonts or dense stitch designs often takes time, especially when working with delicate fabrics. Materials like chiffon, silk, or jersey may show marks, while vinyl and leather can retain needle holes. With care, most garments can be restored or reused without visible damage.
Tools Required for Removing Embroidery
Before learning how to remove embroidery, make sure you gather the right tools. Having the proper supplies helps you avoid mistakes and makes the process smoother.
Seam Ripper: A must-have with a sharp tip for sliding under stitches.
Stitch Eraser: An electric embroidery eraser that looks like a trimmer, ideal for larger designs.
Embroidery Scissors: Small, sharp scissors for precision cutting.
Tweezers: Helpful for pulling loose threads cleanly.
Magnifier or Headlamp: Makes tiny stitches easier to see.
Lint Roller/Brush: Cleans fuzz and leftover threads after removal.
3 Best Ways to Remove Embroidery Effortlessly
Embroidery often involves hundreds of stitches, so patience is key. Here are three proven methods for how to remove embroidery without ruining your fabric:
1. Use a Seam Ripper
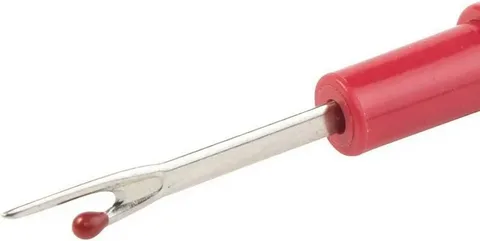
Turn the garment inside out to expose the stitch backing.
Carefully cut a few stitches at a time (especially on thin fabrics).
Pull threads gently with tweezers from the front side.
Repeat until the area is clear, then use a lint roller to remove fuzz.
2. Use an Embroidery Eraser
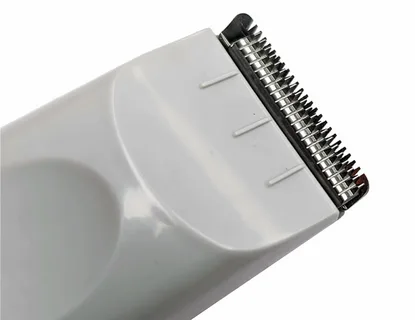
Place the embroidered area in a hoop to keep fabric taut.
Run the eraser gently back and forth across stitches.
Remove loosened threads with tweezers.
Ideal for large machine embroidery designs but not for delicate hand embroidery.
3. Use Embroidery Scissors
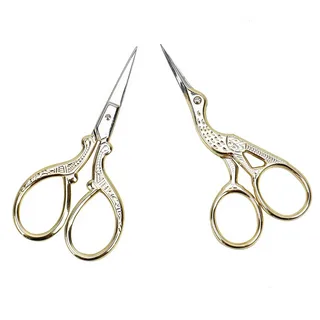
Work from the backside of the fabric.
Slide sharp tips under stitches to cut them precisely.
Remove threads from the front using tweezers.
Finish with a lint brush for a clean surface.
How to Remove an Embroidery Patch
Sometimes embroidery comes as a patch rather than direct stitching. Here’s how to remove it:
Method 1: Cut stitches on the backside using a seam ripper or scissors.
Method 2: If adhesive was used, apply a warm iron or a fabric-safe adhesive remover to loosen the patch.
Alternative Methods to Remove Embroidery
If the standard tools aren’t enough, try these alternatives:
Steam & Heat: Place a damp cloth over embroidery and gently press with a steam iron to soften threads or adhesive.
Freezing: Put the garment in a sealed bag and freeze overnight. Threads become brittle and easier to remove on delicate fabrics.
Will Removing Embroidery Leave Holes?
In some fabrics, yes. Since embroidery involves multiple needle punctures, faint holes may remain after removal. On sturdy fabrics, they often fade after washing or steaming. For larger holes, consider re-embroidering over them or contacting professional digitizers to create a new design that covers the area seamlessly.
Final Words: Is Embroidery Removal Challenging?
Learning how to remove embroidery takes patience, but it’s absolutely doable with the right approach. Whether you’re fixing a mistake, refreshing old apparel, or preparing fabric for a new design, these methods can save time and money.
And if you’re ever stuck with stubborn designs or need a custom embroidery digitizing service, our team at Ez Stitch Digitizing is here to help. We provide fast, affordable digitizing and vector art services for crafters, small businesses, and apparel brands worldwide.
📩 Reach us at info@ezstitchdigitizing.com or message us on our Facebook page.
Frequently Asked Questions (FAQs)
Q1. What’s the fastest way to remove embroidery?
The quickest way is to use an embroidery eraser (stitch eraser). It works like a trimmer, cutting multiple stitches at once. Just make sure to keep the fabric taut to avoid snags.
Q2. Can embroidery backing be removed easily?
Yes. Peel away stabilizers or backings gently. For stubborn adhesive, apply low heat with a pressing cloth. Always test on a small area first to protect the fabric.
Q3. Does removing embroidery damage clothes?
Most of the time, no. However, thin or delicate fabrics may show small holes where stitches once were. These usually reduce after washing, steaming, or by re-embroidering over the area.
Q4. How do I remove embroidery patches from shirts?
Start by cutting the stitches on the inside of the shirt. If glue was used, carefully apply steam or use a fabric-safe adhesive remover until the patch lifts off.
Q5. Can I reuse fabric after embroidery removal?
Yes, in most cases. Strong fabrics like cotton, denim, or polyester can handle embroidery removal well. Just clean up loose threads and press the fabric before reuse.